On a second-hand pc on a residential wifi in so called “Australia”
!!—!!— You will need 2 computers for this setup, one for the server and then one that you will use to set it up –!!–!!
This setup has been completed using debian for the server and a laptop running linux mint. Steps may vary depending on your distro / os or other variables. Do not take this as a set doctrine or absolute, only as a rough guide that may provide you some insight into the process.
Intro / Thoughts
Why Mastodon?
Design, software, labour, love, protocols are all political and the futures that are possible in our lives, communities and world can be limited, coerced or liberated through them.
The dominant tech stack of the empire is prompting us towards controlled futures. Mastodon, activitypub and the fediverse break away from this authoritarian control and are systems developed by the people for the people, where the workers, contributors, artists, memers, bloggers and lurkers all own the code, can modify, localise, scrutinise or contribute.
If there is a better future, this would be the sort of protocol that would prefigure it.
Also, social media is fun and i dont want to be surveilled and manipulated just to see my friends/families updates.
Why Co-op Cloud?
Co-op cloud and autonomic seem very cool and very aligned with a people empowering politic. It’s a co-op focused easy to use system, using a maintenance tool called Abra. To easily maintain and spin up docker containers of popular FOSS digital services.
It has meant that I’m able to host multiple services on my workstation without much fuss. And it’s been really handy to be able to spin up instances of other community projects quickly, like Lauti, NextCloud or even the WordPress this blogpost exists on.
Tutorial / Process
Rough Overall process
- Get a domain
- Installing debian or ubuntu server
- Port Forwarding
- Dynamic DNS
- SSH
- Setting up Abra
- SMTP
- Abra app new mastodon
- Config File and troubleshooting.
- Going Live.
Step 1. Get a domain
This step can seem fairly straight forward, however there are many domain providers to choose from. There is a sliding scale between privacy, features, ease of use and cost.
Personally I went with namecheap for this decision as it is on the cheaper side and has ddns support built in which is important as my internet provider sometimes changes my IP address.
If I was not looking at out of the box, I would probably look to purchase my domain from NJALLA. Their values towards privacy seem great!
Step 2. Installing Debian or Ubuntu Server
For my installation I opted for Debian. If you would like to do the same head to debian.org and press the download button on the main page.
“Debian is Free Software.Debian is made up of free and open source software and will always be 100% free. Free for anyone to use, modify, and distribute. This is our main promise to our users. It’s also free of cost.” ~ https://www.debian.org/intro/why_debian
Go through the setup process, of the grpahical install. When it gets to choosing packages to install unselect the desktop environments. ie. GNOME and select to install the SSH server.
No need to select the web server as apache2 would get in the way of co-op cloud if we were to install it here with the default setup.
Step 3. Port Forwarding
Port forwarding is an important step as it will allow access to your computer / mastodon server from the outside world.
For Abra and Mastodon we will be needing to be able to ssh into our site from anywhere this means we will be needing to port forward ports 20, 443 and 80
- 22 – SSH
- 443 – HTTPS
- 80 – HTTP
This should be enough for the time being,
Step 4. Dynamic DNS
So, the goal is to setup your domain with a dynamically updating IP address.
There are some free online services that will provide you with a DNS route that will then serve as the intermediary to update however in my case namecheap has this built in.
If looking for a dynamic DNS two popular choices are
- Duck DNS
- Free DNS ~ Afraid.org
As there are many DNS providers and methods I will have to leave it up to you to google and find your own way towards your solutions.
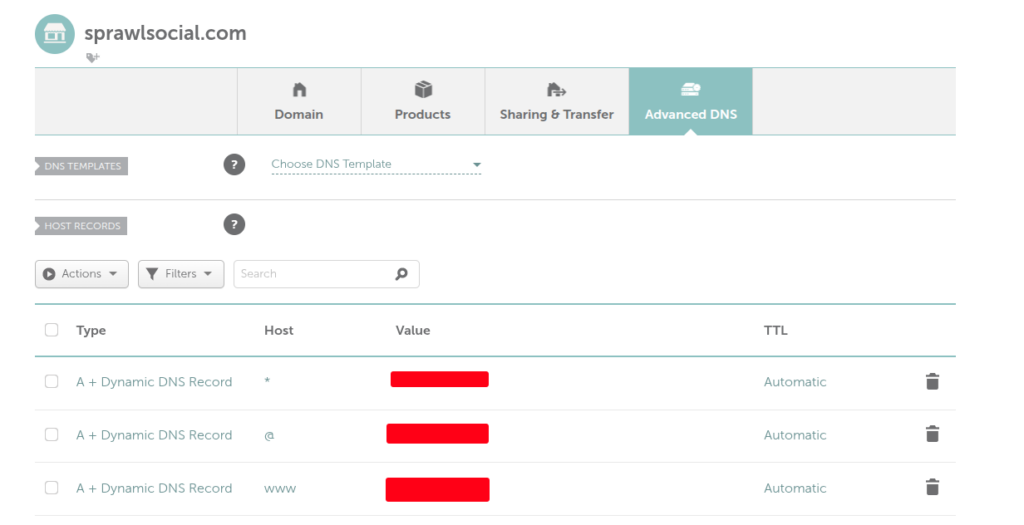
Make sure to update your records on your domain provider to your DDNS service; or in this case with built in DDNS I have set my domain up on namecheap to use their built in system as seen below.
How does DDNS Work?
When your IP address changes, the computer on your home network can still access the internet. So we get a little script to run that points to where your IP address is kept on your domain provider or a service like Free DNS. This record will get updated with your new IP and traffic will continue flowing!
So what script do we run?
For this section I made use of this project – https://github.com/qdm12/ddns-updater however there are a variety of alternatives.
Step. 5 SSH
So, let’s start off by testing.
First just on your local network ensure that you can SSH in.
You will want to find the IP address of the server you are setting up; typically I go to my routers IP / settings page. Look for the name of your server and note the IP.
We will want to use the username you created during the setup of Debian.
Something like this:
ssh user@192.192.23.2.0
You will typically then be prompted for your password.
If you are successfully able to ssh in then Congratulations!!!
Now because we have setup the domain and portforwarding aswell you should be able to do a ssh@yourdomain.com and enter in your password in the same manner. If you’re prompted for a fingerprint just say yes :).
Step 6. Setting up ABRA
Co-op cloud have put together the perfect setup tutorial when it comes to Abra – https://docs.coopcloud.tech/operators/tutorial/#deploy-nextcloud
Complete the steps for setting up Traefik however we DO NOT need to setup nextcloud right now.
Step 7. SMTP
Okay, so I read online that setting up your own SMTP server is quite difficult because of spam filtering on the majority of email providers. ~ This is a shame as I was hoping to self host as much as possible. There are many tutorials when it comes to setting up an SMTP server. In this case I have opted to use mailgun.
Leave a Reply